| Nick Shubin | ||||
| Home | Articles | Photos | Publications | Site Map |
Nick Shubin
November 12, 2011
Here is described the migration from Mac OS 10.6 Snow Leopard to 10.7 Lion. These steps can be helpful for an older version of the operating system.
Before you begin, create a backup of:
~/Library/Mail/
and
~/Library/Preferences/com.apple.mail.plist
and keep it until you are sure that the migration is successful.
On Lion, the user's Library folder is hidden. To open it in the Finder, copy ~/Library/, choose Go > Go to Folder, paste the path, and click Go.
If you need to reinstall the same version of Mac OS, simple copying the Mail folder and preferences file (two paths above) works perfectly. Importing described below is needed to migrate to a different version of Mail.app which can use slightly different file formats or database structure.
Importing requires that you have access to the old messages originally located in this folder:
~/Library/Mail/
1. Setting up your account(s).
Once you open Mail.app for the first time, you have to set up an account. Unfortunately there is no way to import accounts.
Run Mail.app (I had version 5.0 on 10.7). Set up your account(s).
Tip:
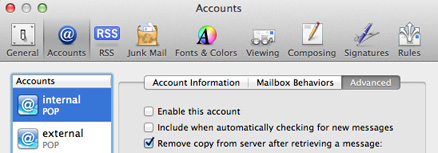
Deactivate all accounts to prevent Mail.app from accessing the mail server until the migration is finished. In the Advanced tab of the Preferences (Cmd-,), deselect "Enable this account" and "Include when automatically checking for new messages".
Quit Mail.app
Another tip:
Create a backup of the just created account(s). If at following steps something goes wrong, you don't have to repeat step 1 again. To backup, right-click on the
~/Library/Mail/
folder in the Finder and select Compress "Mail". To restore the saved state, delete the Mail folder and double-click on the backup archive.
2. Transferring the mail rules.
While Mail.app is not open, copy MessageRules.plist from the old Mail folder to the new one ~/Library/Mail/V2/MailData/. Delete MessageRules.plist.backup if it is there.
3. Open Mail.app and check out the presence of the rules in the Preferences.
4. Import your old mailboxes.
4.1. Choose File > Import Mailboxes. Select "Apple Mail" and click Continue.

I tried to choose "Files in mbox format" thinking that this way one can import mailboxes individually. At the following step, I selected a folder named *.mbox which was created by Mail.app version 4.5 on Mac OS 10.6. But this has returned an error "No valid mbox files were found". Maybe this option is for older formats.
4.2. Select the Mail folder (where you import from). Click Choose.
4.3. At this step you can preview the content of all found mailboxes.
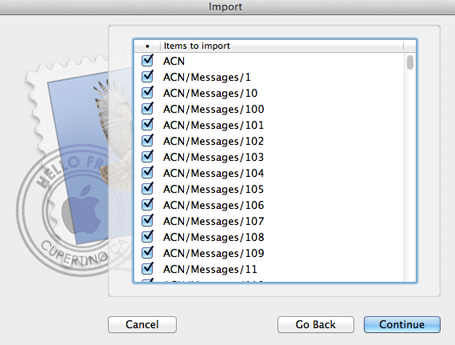
Each item in the list as "ACN/Messages/1" seems to correspond an individual file like
/Mail/Mailboxes/ACN.mbox/Messages/1.emlx
that stores an individual message.
If you wish to exclude a whole mailbox, clicking on individual check boxes is ineffective. Also there is no any multi-selection option to switch off many items together.
To exclude a mailbox (ACN, for instance), move the corresponding folder
/Mail/Mailboxes/ACN.mbox/
outside the folder you import from. Note that doing this now is too late. If needed, exclude mailboxes before step 4.2.
4.4. Click Continue to start the importing process.
Importing takes much longer than copying an equivalent amount of files. On my computer importing was five times slower than copying. Importing speed was about 3 GB per hour. It seems (not proved) that the sleep mode can interrupt the process, and you'll have to start it from scratch. If this is true, it is reasonable to temporarily turn the sleep mode off.
5. Verification and bringing everything in order.
5.1. Quit and reopen Mail.app
5.2. The imported mailboxes are placed to the Import mailbox. Move them to the proper locations.
5.3. Make sure that the search tool works well. Open an arbitrary message. Copy an e-mail or a portion of text from it into the search box. See if the test message is found.
If the search tool work improperly, you can recreate the SpotLight index using this shell command:
sudo mdutil -E /
5.4. Make sure that the mail rules are present in the Preferences.
5.5. If you followed the first tip in step 1, now it's time to activate your account(s) by selecting "Enable this account" and "Include when automatically checking for new messages" check boxes in the Preferences.
© 2016 Nick Shubin. All rights reserved.